


Web Components are getting more and more popular, and they are definitely here to stay. As we speak, the support for Web Components is growing, and still more resources, libraries, and tools are becoming available for developers who are interested in creating and publishing their own Web Components.
In this article, I will be covering how to create a small app using React, and build it as a Web Component.
I will assume basic experience with React and Webpack.
TL;DR
You can build a React App and wrap it in a Web Component — it just takes a bit of tweaking to make it work properly.
The easiest way to get going is to use Direflow

npm i -g direflow-cli

direflow create
What are Web Components?
Web Components are a way of building custom, reusable, encapsulated HTML tags to use in web pages and web apps. Web Components are based on existing web standards and can be used in combination with any JavaScript library or framework that works with HTML. Hence, they are framework agnostic.
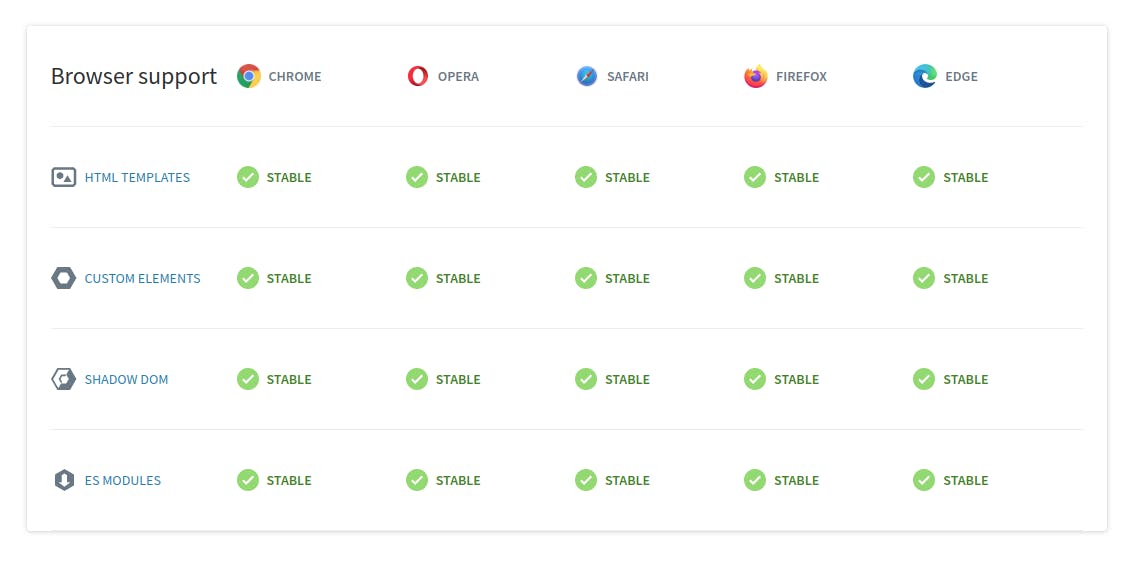
Components build on The Web Component standard are supported by all major browsers.
A Web Component is used by creating a custom HTML element, which can then simply be used as any other HTML tag:
Once a Web Component is built, it can be published to an online registry so that other developers can use the Web Components in their projects. Likewise, you can find a number of Web Components that are already made and ready to use.
See more of all this niceness here on Web Components’ official webpage.
How can you create a Web Component?
Creating a simple Web Component is actually really easy. We are going to be using JavaScript to define a new HTML element and its tag.
To create a new custom HTML element, we are going to do the following
Create a new
classand extendsHTMLElementUse this class to create the component and its logic
Define the new element using the global function
customElements.define()
Let’s take a look at an example
class TopMenu extends HTMLElement {
  connectedCallback() {
    const menuContainer = document.createElement('div');

    const menuItem1 = document.createElement('div');
    const menuItem2 = document.createElement('div');
    const menuItem3 = document.createElement('div');

    menuItem1.innerHTML = 'Home';
    menuItem2.innerHTML = 'About';
    menuItem3.innerHTML = 'Log out';

    menuContainer.appendChild(menuItem1);
    menuContainer.appendChild(menuItem2);
    menuContainer.appendChild(menuItem3);

    this.attachShadow({ mode: 'open' }).appendChild(menuContainer);
  }
}

window.customElements.define('top-menu', TopMenu);
That’s it.
Now we can use our new Web Component in our page like this:
<top-menu></top-menu>
In this example, we are using a shadow DOM which is one of the four main concepts that Web Components are using. For a thorough introduction, refer to Web Components’ official webpage
Of course, building more sophisticated components like this quickly becomes cumbersome. Fortunately, this has been made very convenient and easy with Lit Elements from the Polymer Project.
Creating a Web Component with React
But how about React? Wouldn’t it be really awesome if we could just build the component logic using React, and then build it as a Web Component. Well, absolutely!
Unfortunately, this is not something that we can just go ahead and do. React uses a *virtual DOM, *which is a virtual representation of the actual DOM. Often enough, this clashes with the way the shadow DOM works, causing problems such as using styles and events.
None the less — it can be done. We just need a bit of tweaking 🤓
In order to make React work properly, we need to make the following changes:
Create and define a new custom element
Mount our React App onto that element
Let our React App react to changes of properties and attributes
Make sure that css is applied properly
Make sure that React events are emitted properly
Let’s start from the top, and work through this list step by step.
Create and define a new custom element
Let’s assume that we have built our Top Menu Component as a React Component <TopMenuComponent /> .
Go ahead and define a class that extends HTMLElement and define it’s element using window.customElement.define() just as we did before.
Let’s do this in index.jsx (or the entry point of your React App).
This is where we would typically mount our React App to a div element with the id root in our document.
Mount our React App onto that element
Instead of mounting our React App to a div, let’s mount our React App onto the custom element that we defined.
Change the code according to the following:
class TopMenu extends HTMLElement {
  mountPoint;

  connectedCallback() {
    this.mountReactApp();
  }

  disconnectedCallback() {
    ReactDOM.unmountComponentAtNode(this.mountPoint);
  }

  mountReactApp() {
    if (!this.mountPoint) {
      this.mountPoint = document.createElement('div');
      this.attachShadow({ mode: 'open' }).appendChild(this.mountPoint);
    }

    ReactDOM.render(<TopMenuComponent />, this.mountPoint);
  }
}

window.customElements.define('top-menu', TopMenu);
Now, if we go to the index.html file where the div with the id root is located, and change that div to our Web Component instead.
Remove:
<div id="root"></div>
Add:
<top-menu></top-menu>
NB: If you’re using Webpack, make sure that your bundle is injected into the `<head>` section of your HTML file.
This should render your Web Component! However — it probably looks pretty weird, because will still need to fix styling. Don’t worry — we’ll come back to that in a bit.
Let our React App react to changes of properties and attributes
Let’s start by listening to attribute changes.
In this case, we expect the Web Component to be able to receive two attributes: menutitle and menucolor .
We will make the following changes to the index.jsx file:
Create an instance variable
attributes.Create a method
attributeChangedCallback()which will update theattributesvariable with the new attributes.Create a static getter method
observedAttributes()which returns a list of attributes to observe for changes. (note that the observed attributes must be in lower-case).Finally, pass down the updated attributes as props to our React App
After the attributes have been set, we also want to call the mountReactApp() method again, to make sure a rerender is triggered.
The result will look like this:
Now we also want to handle properties. In this case, we expect the Web Component to be able to receive a list of strings as a property, which will be the titles of the menu items in our Web Component.
We handle this by creating a setter for our property. We imagine that we also might want to get that value back from the Web Component, so let’s also create a getter.
Of course, we make sure to call mountReactApp() to trigger rerender after a property value have been set.
Moreover, we pass down the properties as props, just like we did with the attributes.
Our index.jsx file now looks like this, in its entirety:
So far so good!
Try to go to your index.html file and use one of our attributes:
<top-menu menutitle="Cool menu"></div>
Now go to your React Component:TopMenuComponent, and console.log out the props.
You should now be able to see the value 'Cool menu' as a prop!
In the same way, a changed property should be available through props as well.
To test it, add this script tag in the bottom of your index.html file:
<script>

const topMenu = document.querySelector('top-menu');
topMenu.menuItems = ['Home', 'About', 'Log out'];

</script>
All good! Our Web Component can now react to attributes and properties, and we can pass those down to our React App as props 👐
Make sure that css is applied properly
As you may have noticed, styles probably aren’t getting applied as they should. So everything looks a bit messy.
This is due to the fact, that the Shadow DOM is encapsulating everything underneath it, and if you’re using style-loader, css-loader or the like with Webpack, the styles simply don’t get applied.
Fortunately, there’s a sleek little workaround. We are going to use a package called style-it to inject our styles directly into the DOM.
So go ahead and install style-it with npm or yarn.
yarn add style-it
We’re also going to change our Webpack config file to use to-string-loader.
Let’s go and update our Webpack config to use the to-string-loader plugin:
If you are using create-react-app, you will need to eject first.
Now, we’re going to apply styles as in the following example:
import React from 'react';
import Style from 'style-it';
import styles from './TopMenuComponent.css';

function TopMenuComponent(props) {
  return (
    <Style>
      {styles.toString()}

      <div className="App">
        <div>Cool menu ...</div>
        // Rest of the menu...
      </div>

    </Style>

  );
}

export default TopMenuComponent;
This will simply inject a <style> tag above our component.
A unique ID will also be generated to scope the css class names.
Try to inspect the DOM and check it out — it’s quite cool 😁
Make sure that React events are emitted properly
Another feature of the Shadow DOM is that events are retargeted and encapsulated in the shadow. This is the intended behavior of a Shadow DOM, however, this conflicts with how React works. The unfortunate side effect is, that the delegation of the events invoked from the React app, gets ‘lost’ in the shadow. The consequence is that click and change events end up having no effect when wrapping React in a Web Component.
This means that we need to actively retarget the events from within the shadow back to the scope where they can be reached by React.
The good news is, that this workaround already has been made into a small NPM package that we can super easily implement.
Go ahead and install react-shadow-dom-retarget-events.
yarn add react-shadow-dom-retarget-events
Then we are going to use this inside our mountReactApp() method:
We will end up with a index.jsx file that looks like this in its entirety:
That’s basically it! Now we are ready to go crazy with React, and built this whole thing into a Web Component at the end! 🤟
Using Direflow
This whole thing can be quite a bit of a hassle, especially if this is something you want to do in more than just one occasion.
Therefore, I personally went ahead and built a boilerplate for this exact thing! As I kept building on top of this boilerplate, it soon ended up in a small framework for creating and managing Web Components build in React.
Let me present Direflow.

npm i -g direflow-cli

direflow create
This will bootstrap a template for you based on all of the above practices, thus a bunch of other things that are already taken care of.
The template uses react-scripts for optimal performance, and you can choose to build your Web Component using TypeScript or regular JavaScript. This also means that all necessary polyfills for IE11 support are included.
Registering properties and attributes have been made super easy — you put them in a single file, and they will automatically be observed and provided to the React App underneath via props 👌
Likewise, you can very easily emit events from React, which will be available to add listeners for, when you are consuming the Web Component 🤙
You can read more about the project here https://direflow.io/
Using your Web Component on a web page
Now you are finishing up your React App, and ready to build your Web Component.
The easiest way to bundle your Web Component is to simply use the same Webpack setup that would normally bundle your app.
If you are using create-react-web-component, you can trigger a built by using the command
yarn build
The result will be a JavaScript file in the dist folder of your project, with the name of your component.
For instance dist/TopMenu.js
In order to use this component in your webpage, all you have to do is to import this JavaScript file in the <head> tag of your HTML document, and then use your Web Component directly:
<script *src*="TopMenu.js"></script>

<TopMenu></TopMenu>
I made a live example of two Web Components that are interacting through properties and event emitting with Redux.
Try it out yourself, or check it out on Code Sandbox
<head>
  // Import bundle
  <script src='https://direflow.io/demo-bundle.js' />
</head>

<body>
  // Use directly in browser
  <crypto-cart />
  <crypto-items />
</body>

Publishing your Web Component
Finally, if you want to publish your Web Component so that anyone can get to use your awesome work, then the best place for that is probably on webcomponents.org
Hit the blue **Publish element **button to get started.
You can also browse through a large collection of Web Components that other developers from the community have built and published for you to use for free!
Finally, if you liked this article, give the clap 👏 button a couple of hits!
If you used Direflow and liked it, please give the project a star on GitHub. Your support means a whole lot 🙏😊
You can also find me on Twitter, where I’ll be posting more content similar to this.